There’s great joy to be found in tackling home improvement projects yourself. Going the DIY route doesn’t only help you save big on costs, it can be an incredibly satisfying experience. That is, if you know what you’re doing. A little research upfront can ensure that things go smoothly and helps you avoid a multitude of headaches and frustrations. That’s why we’ve compiled this guide to DIY tiling to help you succeed at elevating your space with gorgeous new tiling.
Installing Tile at Home
Here at Cosmos, we’ll always point out when homeowners should call in professional help with installations. Luckily, with a little patience and know-how, laying tile yourself is a project most homeowners can take on with confidence.
If you’re on the hunt for beautiful, high-quality tiles, Cosmos SurfacesTM offers a wide range of colors and patterns that work for any design style.
DIY Tile Laying: What You’ll Need
There are several methods for laying tile in your home. Before you start, it’s always a good idea to check with your tile manufacturer to ensure your chosen installation method is appropriate. It’s important to note that installing tile floors takes at least several days to complete as mortar and grout need time to dry. You won’t be able to walk on your new floor immediately, so be sure to plan accordingly. Once you’ve chosen tiles for your home, you’ll want to stock up on a few tile laying essentials. The following items will help you become DIY tiling pro in no time:
- Tile membrane (optional)
- Waterproofing tape (to waterproof tile membrane seams)
- Utility knife
- Trowel
- Thinset mortar
- Enough tile to cover the area (and some extra)
- Grout
- Tile cutter (for simple cuts), tile nipper (for cutting curves) and/or tile hole saw (for cutting holes)
- Chalk reel
- Tile spacers
- Wet sponge
- Long level
- Rubber mallet
To remove existing flooring, chisel out the old tile, use a floor scraper to remove old mortar and fill in any uneven spots with leveling compound. Once you have a clean, flat surface, you’re ready to install your new tiles.
How to Install New Tile Floors
The following is one of several methods to install tile floors at home:
- Install a Tile Membrane
The substrate—or surface your tiles are installed on—is an important consideration when tiling. Surfaces that expand or contract with humidity fluctuations can place stress on your tiles, causing cracks. Installing an uncoupling tile membrane as a substrate can lessen this tension and create a waterproof barrier. Using a utility knife, cut the tile membrane to size. Next, spread thinset mortar on the subfloor with the smooth side of your trowel before combing it with the notched side. Work one section at a time so that mortar doesn’t dry before you can install the membrane. Roll the membrane out and press it into the thinset mortar (you can use a wooden float for this). Repeat the process one section at a time and finish by sealing membrane seams, along with where the membrane meets the wall, with waterproof tape.
- Create Reference Lines and Dry Fit Tiles
Measure the center points of opposing walls and snap a chalk line between the two. Repeat with remaining walls to create a central starting point for laying out your tile laying pattern. Snap chalk lines for reference as necessary for your tile pattern. Check your layout by dry fitting tiles with tile spacers to ensure you leave correct expansion gaps. Allow ¼-inch of space along the outer edges of your tiles. If you end with small sections of tile on one end, you can shift the layout, just remember to mark new reference lines.
- Prepare and Spread Mortar
Mix thinset mortar to a peanut butter consistency. Starting at the centerpoint, spread mortar evenly, then comb at a 45-degree angle with the notched side of your trowel. Work one section at a time to prevent mortar from drying.
- Start Laying Down Tiles
Begin laying down tiles along the reference line you created in the center of the room, placing tile spacers between each tile. Ensure tiles make proper contact with the mortar as you go along, applying mortar to the back of tiles whenever necessary.
- Ensure Tiles Are Level
Wipe excess mortar from tiles with a wet sponge as you work and use a long level to check for evenness. Gently tamp down any high spots with a rubber mallet. Cut tile as needed as you approach edges, and don’t forget to leave a ¼-inch gap at the edges and around any plumbing.
- Allow Mortar to Dry
Once you’ve finished laying down tile, allow 24 hours for the mortar to set before applying grout.
- Apply Grout
Remove spacers from between tiles, then apply your choice of grout color to the joints by pressing it in with a rubber float, then pulling grout diagonally across tiles to remove the excess. After roughly 30 minutes, wipe grout lines and clean tiles with a wet sponge. Allow up to 72 hours for grout to set before walking on your newly tiled floor (check the manufacturer’s instructions for setting times). Apply a silicone sealant to expansion gaps at floor edges. After 3 weeks, you can seal your grout to protect it.
Work with Cosmos SurfacesTM
We hope you’ve found this guide to DIY tiling helpful. Cosmos SurfacesTM is a 2nd generation, family-owned business dedicated to providing you with knowledge, excellent customer service and high-quality surface materials. We offer a wide range of tile products and we’re always happy to answer questions and provide expert advice. Contact us today to get started!
Color of the Month: Saffron
Saffron is a radiant gold with bright and deep undertones. It is perfect for adding sunny color to the walls in any living space. Pair with deep toned antiques or clean black and white.
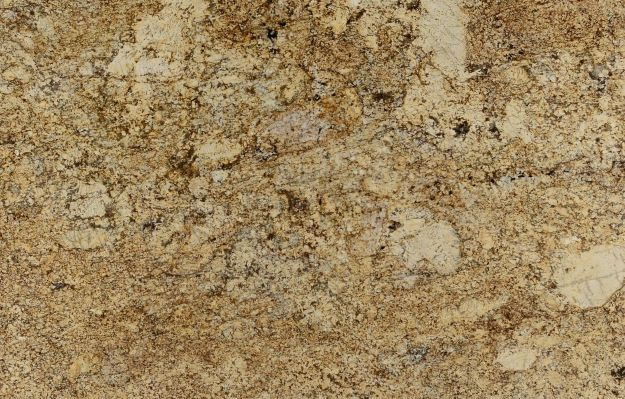
A sun-soaked desert, Solarius creates a warm and inviting atmosphere in any room. Diverse and multicolored, gold, white, and black make up this exotic Brazilian granite. The variety in Solarius makes it perfectly versatile for any space, both interior and exterior. Use Solarius for bathrooms, kitchens, entryways, or outdoor patios.
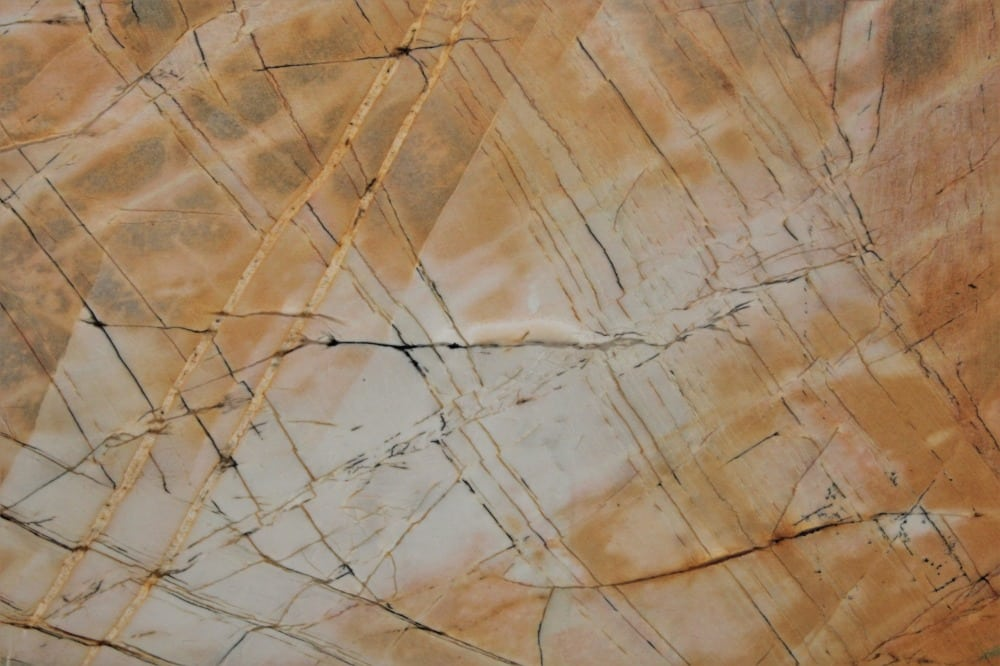
A sheet of gold, it’s no surprise how Golden Paradise got its name. But it’s not just gold – look deeper to see the crystals of whites and grays that make up this Brazilian quartzite. Highly translucent, Golden Paradise makes for spectacular floors, walls, and fireplaces and matches well with blacks and woods. Quartzite is resistant to scratching, staining, and fading, and the beauty is unmatched.